Scrabble Tiles Text Effect(PhotoShop拼字瓷磚文字效果)
以下文章來自「http://textuts.com」
 Notes:


You’ve probably seen a couple of quotes written using the scrabble tiles somewhere on the Internet, like those on Tumblr and Pinterest. They’re really nice and different, but it’s not always easy to create them.
This tutorial will show you how to create your own scrabble tiles set from scratch, so that you can use them anytime with any background you like. It’s really simple and fun, so let’s get started.
The Final Result:

* the software used in this tutorial is Adobe Photoshop CS5 Extended
* the size of the final result image is 1152 * 864
* you might want to check the Basix Page to see some useful topics on dealing with Photoshop basics, such as loading palettes and some shortcuts.
* the size of the final result image is 1152 * 864
* you might want to check the Basix Page to see some useful topics on dealing with Photoshop basics, such as loading palettes and some shortcuts.
Resources:
Step 1:
- Create a new document with the dimensions you need (depending on the text you want to create), here, the document is 1152 x 864 px. Then, Fill the Background with one of the patterns in the Floral Fabric Patterns set, the one used in the tutorial is called “Textures-WhiteFlorals-01_inspyretash-stock.jpg”.
- Place the texture D image on top of the Background layer, then change its layer’s Blend Mode to Multiply.
Step 2:
- Set the Foreground color to #ead89f, pick the Rounded Rectangle Tool, and make sure that the Radius value in the Options bar is set to 5. Then, create the tile in whatever size you like. Here it is 65 x 75 px.
Double click the Shape Layer to apply the following Layer Style:
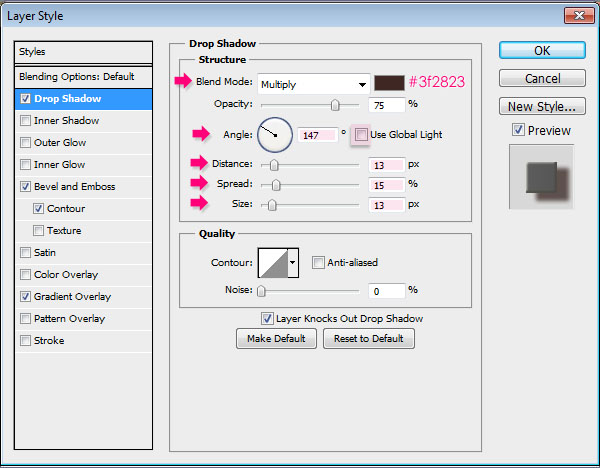
- Drop Shadow: Change the color to #3f2823 and un-check the Use Global Light box as we will need to adjust the shadow Angle to 147. Then, change the Distance to 13, theSpread to 15, and the Size to 13.
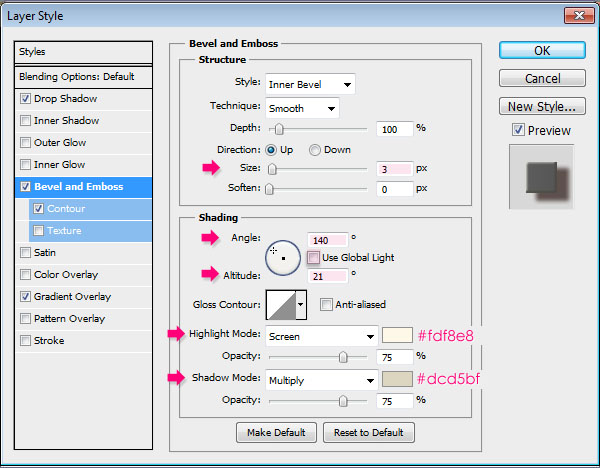
- Bevel and Emboss: Change the Size to 3 and un-check the Use Global Light box. Then, change the Angle to 140 and the Altitude to 21. Also, change the Highlight Mode color to #fdf8e8, and the Shadow Mode color to #dcd5bf.
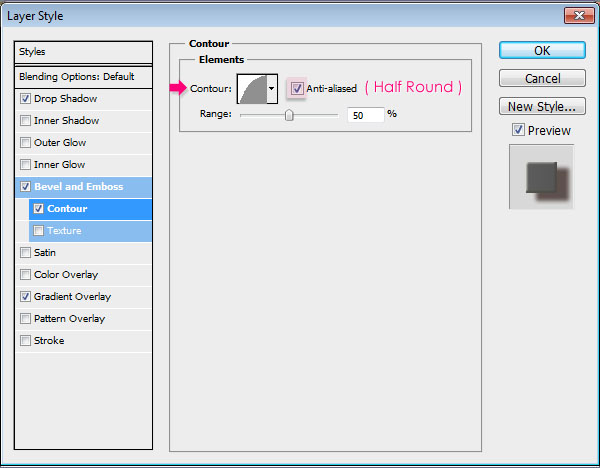
- Contour: Change the Contour to Half Round and check the Anti-aliased box. This will make the Bevel and Emboss effect a bit more defined.
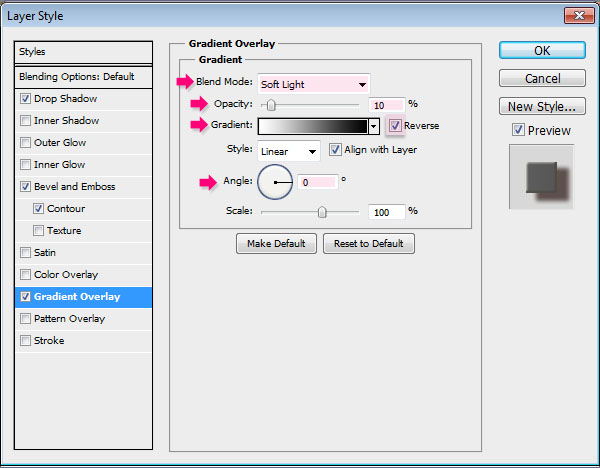
- Gradient Overlay: Change the Blend Mode to Soft Light and the Opacity to 10. Then, choose the default Black, White Gradient, check the Reverse box, and change the Angleto 0. This will make the right side of the tile (where the shadow is) a little bit darker than the left side.
- This is how the tile should look like.
Step 3:
- Now, add the letter you want inside the tile. Use the color Black and any font you like. The font used here is Code Bold – Code Free Font, and the size is 50 pt.
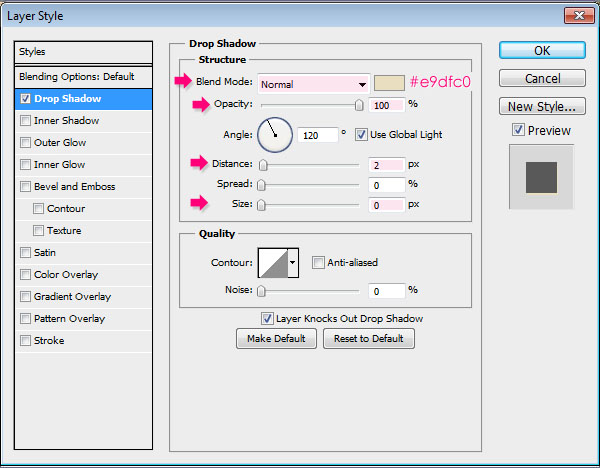
- Double click the text layer to apply a simple Drop Shadow effect. Change the Blend Mode to Normal, the color to #e9dfc0, the Opacity to 100, the Distance to 2, and theSize to 0.
- This will make the text look like it’s engraved in the tile, which will make it look more realistic. Once you’re done, group the tile and the letter, and rename the group to whichever letter it contains.
- Duplicate the group and type in a new letter, then rename the group to the new letter. After that, select the group and press the Move Tool (V) then move the tile around and place it in the document as needed.
- Continue duplicating and placing the tiles until you write the whole word. You can also create a full set of tiles (with all the alphabet letters and numbers as well) and save them in a separate PSD file so that you can use them anytime you want.
Step 4:
- Duplicate the tile group one more time, and delete the text layer. Pick the Custom Shape Tool and set the Foreground color to #d5593d.
- Choose the Heart shape, and draw the heart on top of the empty tile, inside the same group. Then apply the same text Layer Style to the shape layer (Right click any text layer, choose Copy Layer Style, then right click the shape layer, and choose Paste Layer Style).
Step 5:
- Click the Create new fill or adjustment layer icon down the Layers panel and chooseGradient Map.
- Change the Adjustment Layer’s Blend Mode to Multiply, and its Opacity to 40%. Then click the Gradient box to open the Gradient Editor.
- Create the Gradient using the colors #b7a781 and #f9f2ea.
- Select all the layers you have, including the Background layer, and duplicate them. Then go to Layer -> Merge Layers, or press Ctrl + E, to merge the duplicated (copy) layers. Change the merged layer’s Blend Mode to Soft Light, and its Opacity to 30%.
- Go to Filter -> Other -> High Pass and set the Radius to 8.0, then click OK. This will intensify the edges a little bit to make them look more defined.
And that’s it! Now you have your own “Photoshop Scrabble Tiles” that you can use easily to create any text you want in a couple of minutes. Hope you liked it.
- You can download the PSD source file for this tutorial and a full letters and numbers tiles set PSD file for $3 only! Click here to buy the files from the store. -
留言